Go to the previous, next, chapter, table of contents.
8.7 Creating and Sending a Message
8.71 Writing a Message
By now you should an understanding of the Microdot-II interface, menus and the
options available to you. Let's assume you want to write a new message (email or news) straight
away within Microdot-II. How do we create a new message?
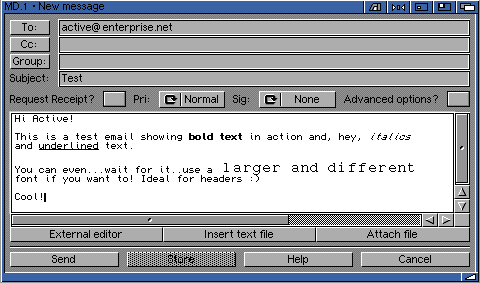
- Goto the message menu and select "Write new..". A GUI will appear:

- If you are creating an email message enter the email address of the recipient (person
receiving the mail) into the To: section. You can add multiple entries into this box.

Say, for example, we wanted to send an email to Oliver Wagner (the programmer of Microdot-II)
we would insert the email address owagner@vapor.com. Let's say we wanted to send a
copy of the email to the other programmers of NetConnect we would enter their email addresses
into the Cc: box as shown below:

- If you wanted to send a news message you would carry out the same procedure as
you would for email except you would need to enter the name(s) of the newsgroups into the
Group: box.

In the above image we are sending our "new" news message to two newsgroups.
- You would now enter a subject into the subject: box. This can be anything, but
keep it reasonably short.
- Now you are ready to start typing! If you want to import text into the main window
click on the Insert Text File button and a requestor will appear. You can also
launch an external editor - although any Rich Text Formatting (see below) will be lost.
- To add a signature choose a signature from the cycle gadget. This will be "tagged" to
your message when you choose to send it.

Please Note: that if you use the external editor all styles (bold, italics etc)
you have applied to your message will be lost. This also applies to attached files.
Therefore, if you want to add external files, add the files at the end of your
message.
8.72 Using the Address Book
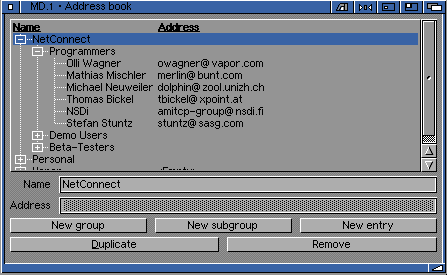
Microdot's address book is opened by selecting Open address book... from
the Settings menu (Hotkey Amiga-A). Here you can add, delete or edit email
addresses for your own Microdot "phone book". The address book interacts
with the "write new message" to allow you to select addresses for the "to:"
"Cc:" sections.
|
New Group adds a new group name to the listview. This group will
contain your addresses for a particular topic. ie. create a group called
"friends" and you could put all your friends email addresses into this group,
separating them from others.
|
New Entry allows you to add an email address into the "address book".
If you have created a group the new entry would go into this group.
|
|

|
|
The Duplicate button makes a copy of an address, while the Remove button
removes it completely.
|
New Subgroup allows to create another group within a main group. If you
had a group called "business" you could create a sub-group called "contacts" another
called "suppliers" etc etc.
|
8.73 A Word About Rich Text Formatting
Microsoft is shipped with the impressive textview editor which allows word-processing
style features for your email and news messages!
Textview supports Rich Text Formatting (RTF). What is RTF? RTF is a method of creating
different styles within a document with different codes. You don't, of course, see the codes
within your messages. ie. if you wanted to create a bold selection of text the codes used
would look like this <BOLD> text</BOLD> - however in your program you
would just see this text (ie. the codes would be hidden.

What does RTF support? The following options:
Multiple Fonts  - Only 2 fonts supported within the current textview
Font Styles     - bold, italics, underline and a combination of these styles
Coloured Text   - supported in the near future
Alignment       - supported in the near future
By clicking your right mouse button you will be presented with a list of options where you
can apply the different styles or change fonts etc.

Please note: that if you send a Rich Text Formatted message the recipient needs a mail
program that shows RTF documents. Microdot-II is currently the only Amiga mailer that supports
Rich Text Formatting. However, on the PC and Mac, most mail-related programs support RTF -
Eudora, Netscape (mail), Microsoft Explorer v3 (mail), Turnpike etc.
8.74 Attaching Files
Microdot allows you to attach external files to your message. Just click on the "attach files"
button and a requestor will appear. Just find the file(s) you want to attach and load them into
the mail program.
You may be asked if you want the file(s) as UUencoded or attached - you are
best choosing "attach".

You should see something like the above, when you attach your files. Remember - you shouldn't
send large attached files unless the recipient knows it is being sent and do not send
attached files to newsgroups (except for binary newsgroups).
8.75 Sending Your Message
Now your message is created you can send this to your friends. You have two options:
Send   - if you are online this sends your message straight away
Store  - if you are offline then this will queue your messages to be sent later
Most people will create their emails offline. If you press store your mails will be
stored within the SPOOL directory.
The next time you go online you need to goto the Microdot menu and select
Send Queued Messages

This GUI will appear and will show you the progress of your messages being sent to your
ISP.
Go to the previous, next, chapter, table of contents.


